TERM 3
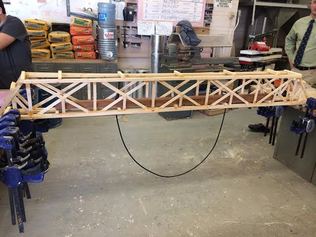
-This project was to create an 8 foot bridge with a group.
-Before I started the project our group had to come up with ideas for how we were going to make the bridge. We also had to research different truss designs to incorporate into our bridge.
-The steps to create this project were 1 think of bridge ideas. 2 research truss designs. 3 drew the design on paper. 4 built 2 trusses and connected them at the top and bottom using more wood. 5 We finally tested the bridge using our groups weight to accomplish our goal of withstanding the weight of our group.
-The final product after testing was still an unbroken bridge that withstood our groups weight.
-As our group was making our super bridge Mr. Ramos advised us to make I beams to make the bridge stronger. If we did not take this advice our bridge would have broken easier.
- Doing this project I learned how to balance structures and that more weight does not mean its a better structure. We used the table saw, miter saw, and ban saw to create this bridge.
- I would use these skills in real life if i ever need to go through the designing process or need to come up with ideas for a group. I also now have a better understanding on bridges.
- If I could do this project again I would change the truss design to be rounded so the bridge would be stronger and hold up more weight.
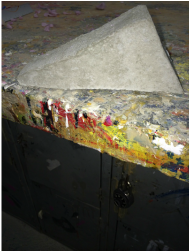
-This project was to make something useful out of cement that could fit in our lockers.
-Before I started this project I had to think of ideas on what product i wanted to make. After figuring out what i wanted to do I drew my design and handed it into Mr. Ramos.
-The steps to create this project was 1 think of a design. 2 draw the design and pass it into Mr. Ramos. 3 make the mold out of pink foam and glue it together. 4 Then I made and poured the cement into the mold. 5 I removed the excess cement and palm sanded the mold to get the air bubbles out. 6 I let the cement dry for 4 days then carefully removed it from the mold.
- The final project was a door wedge made of concrete.
-While I was making my design, Mr. Ramos advised me to put steel bars into the mold to make the cement harder to break. If I did not take this advise my concrete would have broke a lot easier.
-During this project I learned how to make the bars that are put into concrete to make it stronger. I also learned how to make useful items out of simple materials.
- I could use these skills in real life by again fixing simple things with concrete around the house.
-If I could use this project again I would make my mold smaller so it would fit under a door.
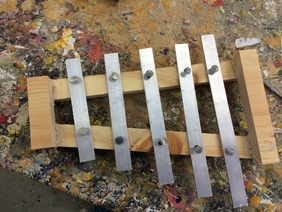
-This project was to create an instrument that makes a beautiful noise.
-Before I started this project I had to think of many ideas on the internet. I spend a whole class trying to figure out what project I wanted to do. I then had to draw out my design and pass it into Mr. Ramos.
-The steps to create this project was 1. Think of a design. 2. Draw my design and pass into Mr. Ramos. 3. Cut 2 pieces of wood for my base. 4. Cut 2 smaller pieces of wood to connect the two bases. 5. cut 5 pieces of aluminum using a metal cutting bit on the jigsaw. 6 Drill holes on both ends of the aluminum. 7. nail the pieces of metal into the wood at different lengths.
-My final project was a xylophone.
-While I was completing my project Mr. Ramos showed me how to easily cut the aluminum with a metal bit in the jigsaw. If he did not show me how to use this it would have taken me a lot longer to cut the individual pieces of metal.
-During this project I learned how to use the jigsaw to cut metal, I used the miter saw and I also learned how to drill holes in metals.
-I could use these skills in real life when I or someone I know has children I will be able to make musical instruments for them to play with. I could also use these skills any time I need to cut pieces of metal.
-If I could do this project again I would nail the pieces of metal in more loosely so the metal could vibrate and make a louder sound.

-This project was to create a wind turbine that produces the most voltage in the class.
-Before I started this project I had to research the best propeller design that would produce the most voltage and research the best design for the base to be so, it will be sturdy and not fall over.
-The steps to create this was 1. research 2. give Mr.Ramos a well planned design. 3
-The final project was an 8 foot wind turbine.
-While making the project our first propeller design failed to work. Mr. Ramos told me and my partner why it was a failure and to use it as a learning experience to make a better propeller design. If he did not give us this advice our propeller would not spin properly and it would not produce the most voltage.
-During this project I learned how to test a motor using a drill bit, used the sander to curve the propellers, used the table saw to cut the wood for the base, and also used cement to make the end base for the turbine.
-I could use these skills in the classroom if I ever need to test something to see if it works or not. This would be most useful in math and science.
-If I could do this project again I would make the propeller a different design so, it would produce more voltage.
